
How Kubernetes Handles Scaling
When traffic spikes or resource demands increase, applications need more computing power to keep up. Without scaling, workloads can become slow or unresponsive under heavy load. Kubernetes manages this by adjusting the number of pods running in a deployment or modifying the resources allocated to each pod. This makes sure that applications remain available without over-provisioning infrastructure.
If you're setting up a Kubernetes cluster, check out this step-by-step guide on creating Kubernetes clusters using GKE and Terraform to get started before implementing scaling strategies.
Pod vs. Node Scaling in Kubernetes
Kubernetes scales workloads at two levels: pods and nodes. Pod scaling adjusts the number of running instances of an application, while node scaling makes sure that the cluster has enough compute capacity to support those pods.
Pod Scaling: Horizontal vs. Vertical
There are two ways to scale pods - horizontally by changing the number of replicas or vertically by adjusting CPU and memory allocations.
The Horizontal Pod Autoscaler (HPA) automatically scales pods based on predefined thresholds. If CPU usage exceeds a set limit (e.g., 40%), HPA adds more pods to distribute the load. When demand decreases and returns to normal levels, Kubernetes scales down the number of running pods, ensuring efficient resource usage without manual intervention.
Whereas, the Vertical Pod Autoscaler (VPA) modifies resource requests and limits of existing pods. It helps applications that require stable workloads within a single pod rather than distributing traffic across multiple instances.
If there are not enough nodes to run new pods, Kubernetes needs to scale the cluster itself. The Cluster Autoscaler increases or decreases the number of worker nodes based on resource availability. When a pod cannot be scheduled due to lack of CPU or memory, the autoscaler provisions a new node. If a node remains underutilised for a long period, it is removed to optimise costs.
Scaling in Kubernetes is important for balancing performance and resource efficiency. The right approach depends on workload characteristics - stateless applications benefit from HPA, while resource-heavy workloads that require stable resource allocations may use VPA. Cluster Autoscaler works alongside both to ensure the underlying infrastructure scales dynamically to meet application demands.
Why Use Helm for Scaling Kubernetes Deployments?
Now, Kubernetes provides built-in mechanisms for scaling applications, but managing these configurations across different deployments isn’t always a simple task.
When dealing with just a few manifests, using kubectl to manually adjust scaling configurations may be manageable. However, as the number of deployments increases, manually modifying YAML manifests can become error-prone and inefficient. This is where a package manager like Helm becomes important, providing a structured way to manage scaling configurations across multiple environments while maintaining control over deployments.
Centralized Scaling with Helm
Helm allows engineers to define scaling parameters - such as replica counts, resource limits, and autoscaling thresholds - inside a values.yaml file. Instead of modifying Kubernetes manifests for each deployment, changes are made centrally and applied consistently. This ensures that scaling policies remain version-controlled, reducing the risk of misconfigurations when adjusting capacity.
Managing scaling across different environments also becomes easier with Helm. Development, staging, and production environments often require different resource allocations, but modifying these manually for each environment can be a difficult task. Helm makes it possible to apply environment-specific configurations while keeping the deployment logic unchanged.
Helm and HPA: Working Together
Helm does not provide direct integration with the Horizontal Pod Autoscaler (HPA), but it helps organize and manage scaling configurations in a structured way. Just like kubectl, Helm can apply configurations for HPA, but its primary role is as a package manager, making it easier to manage scaling-related settings across multiple deployments. Instead of manually handling multiple YAML manifests for different environments, teams can define HPA configurations inside values.yaml, ensuring consistency across deployments without needing to modify individual manifests.
Managing scaling policies manually across multiple environments can be complex. Consider a scenario where an organization has four environments - development, staging, testing, and production - each requiring around 15 Kubernetes manifests. That’s 60 manifests to manage individually using kubectl, increasing the risk of inconsistencies, human errors, and deployment drift.
Helm simplifies this by packaging all configurations together, allowing teams to apply updates, rollbacks, and environment-specific scaling policies without modifying each manifest separately.
Integrating HPA with Helm
Now Kubernetes provides autoscaling capabilities to make sure that applications can handle fluctuating workloads efficiently. The Horizontal Pod Autoscaler (HPA) plays an important role in this by dynamically adjusting the number of running pods based on real-time resource usage. Instead of provisioning a fixed number of replicas, HPA monitors CPU, memory, or custom metrics and scales pods up or down accordingly. This prevents performance bottlenecks during traffic spikes while avoiding unnecessary resource consumption when demand decreases.
Manually configuring HPA involves creating a YAML manifest that defines the autoscaling behavior and applying it using kubectl apply. This process includes specifying the target deployment, setting resource utilization thresholds, and defining the minimum and maximum number of replicas. While manageable for a few applications, scaling this approach across multiple deployments and environments can become complex and error-prone.
To enable HPA in a Helm-managed deployment, the values.yaml file needs to include scaling parameters like minReplicas, maxReplicas, and resource utilization thresholds for CPU or memory. These parameters define how Kubernetes adjusts the number of pods based on resource consumption. For example, the following configuration ensures that the deployment scales between 1 and 6 replicas when CPU usage exceeds 40%:
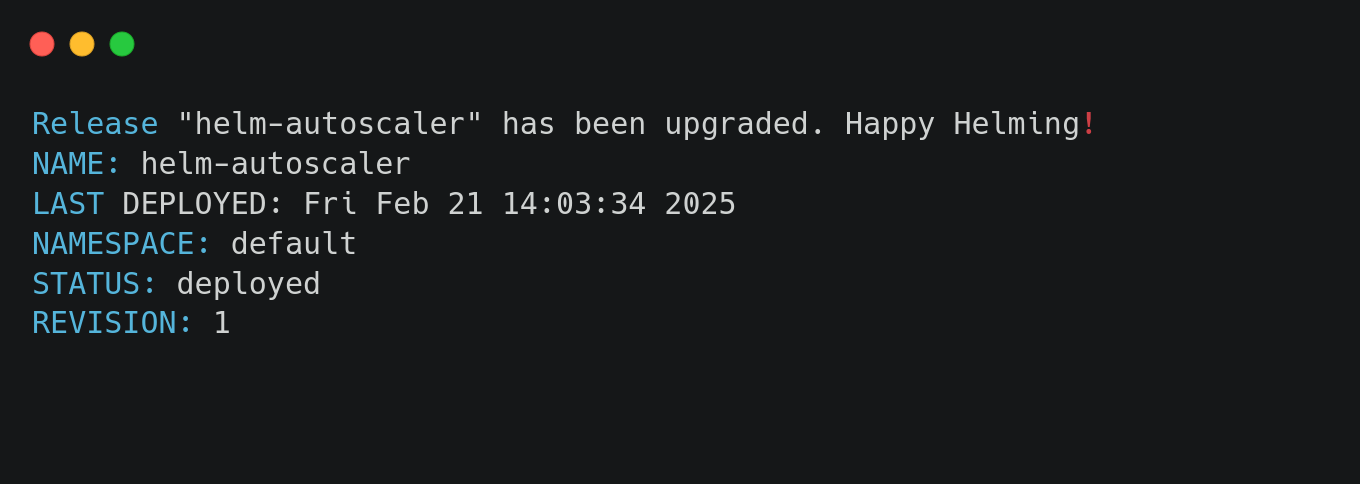
Once defined, Helm applies these configurations across deployments using helm upgrade helm-scaler ..
Instead of updating scaling policies for different environments, Helm allows teams to use separate values.yaml files. This means development, staging, and production can have different scaling configurations without requiring changes to deployment logic.
With Helm managing HPA configurations, scaling policies remain consistent and version-controlled. Kubernetes automatically adjusts pod counts as needed, while Helm makes sure that these scaling rules are applied correctly without any manual intervention.
Deploying and Managing Autoscaling with Helm
Now that we’ve covered how Kubernetes handles scaling and how Helm simplifies managing scaling configurations, it’s time to put these concepts into practice. This section walks through deploying an application using Helm and configuring the Horizontal Pod Autoscaler (HPA) to dynamically adjust the number of running pods based on resource usage. By the end, you’ll have a fully operational setup where Kubernetes scales workloads automatically based on CPU and memory utilization.
The hands-on process involves four key steps: setting up a Helm chart, defining resource configurations, applying HPA configurations, and finally, testing scaling behavior by generating artificial CPU load.
Step 1: Install and Configure Helm
Before deploying an application, make sure that Helm is installed and configured to pull charts. If Helm is not installed, it can be set up using:
Once Helm is installed, add the stable Helm repository and update it:
Step 2: Set Up values.yaml for Autoscaling
To enable autoscaling, modify values.yaml to define resource configurations and HPA policies. This makes sure that Kubernetes scales the deployment when CPU or memory usage crosses a threshold. The following configuration sets the minimum number of replicas to 1, allows a maximum of 6, and scales up when CPU or memory usage exceeds 40%.
Step 3: Deploy the Helm Chart
Once the values.yaml file is updated, apply the Helm chart:
This deploys the application while ensuring autoscaling configurations are applied.
Verify the deployment using:

This command should display a running pod for the helm-scaler deployment.
Step 4: Verify HPA Deployment
After the Helm deployment, check if the Horizontal Pod Autoscaler (HPA) is correctly applied:

This command continuously watches HPA metrics, displaying real-time CPU and memory usage along with the number of replicas.
To see a more detailed breakdown of the HPA configuration, use:
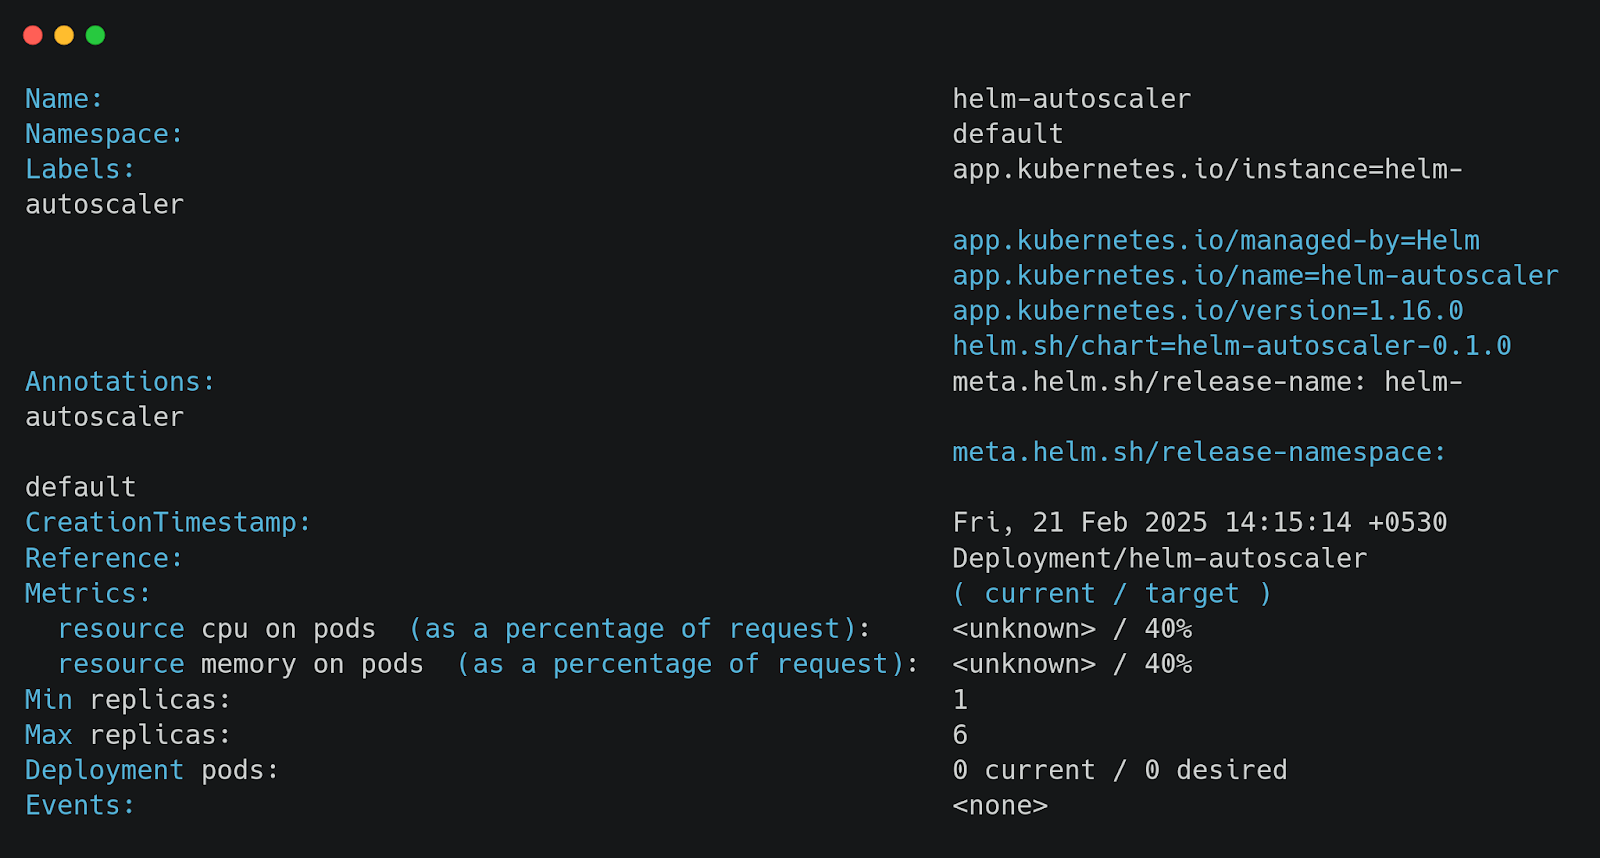
This command provides insights into scaling thresholds, current utilization, and scaling conditions.
Step 5: Simulate High CPU Load to Trigger Scaling
To observe autoscaling in action, artificially generate CPU load on a running pod. This forces HPA to increase the number of replicas.
First, get the name of a running pod:
Once you have the pod name, execute a high CPU load process inside it:
This continuously computes SHA-256 hashes of an infinite data stream, causing CPU utilization to spike.
Now, re-run:

You should see HPA scaling up the replicas as CPU usage crosses the 40% threshold. As the load decreases, Kubernetes will gradually scale the replicas back down.
By following these steps, you now have a working setup where Kubernetes dynamically adjusts pod counts based on demand. Helm ensures consistency across environments, making scaling easier to manage without modifying Kubernetes manifests manually.
Best Practices for Scaling Kubernetes Deployments with Helm
Just enabling HPA and Helm isn’t enough. Misconfigured resource limits, unbalanced scaling thresholds, or inefficient policies can lead to throttling or excessive scaling.
Let’s explore some of the best practices to make sure that scaling remains predictable, efficient, and cost-effective at the same time.
Using Auto-Scaling to Match Workload Demands
Workloads rarely have a fixed resource requirement. Traffic surges, background jobs spike CPU usage, and database queries increase memory consumption. Instead of manually adjusting resources, HPA automatically scales pods based on real-time demand. Helm makes this process structured by defining HPA parameters centrally in values.yaml, ensuring consistent scaling across environments.
For example, setting HPA to scale pods when CPU usage exceeds 40% prevents under-provisioning during high loads while avoiding unnecessary pod creation during idle periods.
This approach ensures that applications scale dynamically while avoiding manual intervention.
Balancing Resource Requests and Limits
Helm makes it easy to define CPU and memory requests, but incorrect values can cause performance issues. Low requests lead to pod throttling under load, while high limits cause inefficient resource allocation.
A balanced configuration sets requests conservatively while allowing some buffer with limits.
This setup ensures workloads get the resources they need while Kubernetes efficiently schedules them across nodes.
Testing Scaling Scenarios Before Production
Scaling works only if tested under real-world conditions. Load testing in staging helps validate whether HPA reacts correctly to high demand before rolling out to production.
To simulate CPU load and trigger scaling:
Observing kubectl get hpa --watch ensures HPA adds or removes replicas as expected. Without testing, misconfigurations may lead to scaling failures in production.
Using Helm Values for Environment-Specific Scaling
Different environments (production, staging, development) need different scaling settings. Instead of manually modifying YAML manifests, Helm allows teams to define environment-specific values.yaml files.
This makes sure that each environment gets the right scaling policy without altering deployment logic.
Now, scaling Kubernetes workloads effectively requires more than just configuring autoscaling policies. Teams need visibility into how deployments, replica sets, and pods interact, whether scaling changes are applied consistently across environments, and if infrastructure drift is causing discrepancies. Without a structured view, identifying scaling inefficiencies and misconfigurations becomes difficult.This is where Firefly comes into the picture.
Monitoring Scaling in Kubernetes with Firefly
Firefly provides a clear visual representation of Kubernetes deployments, making it easier to track how autoscaling affects the overall infrastructure. Instead of running multiple kubectl commands to check deployments, replica sets, and pods, Firefly maps these relationships in a more structured format.
Understanding Deployment Relationships in Kubernetes
In Kubernetes, scaling a deployment results in the creation of multiple replica sets, each managing a group of pods. However, tracking how these replica sets evolve over time and making sure that scaling policies apply correctly can be a bit difficult.
Firefly’s Relationship Graph feature provides a structured view of a Kubernetes deployment, showing how it connects to replica sets and pods. This helps teams verify whether scaling is working as expected and whether old replica sets are being cleaned up properly.

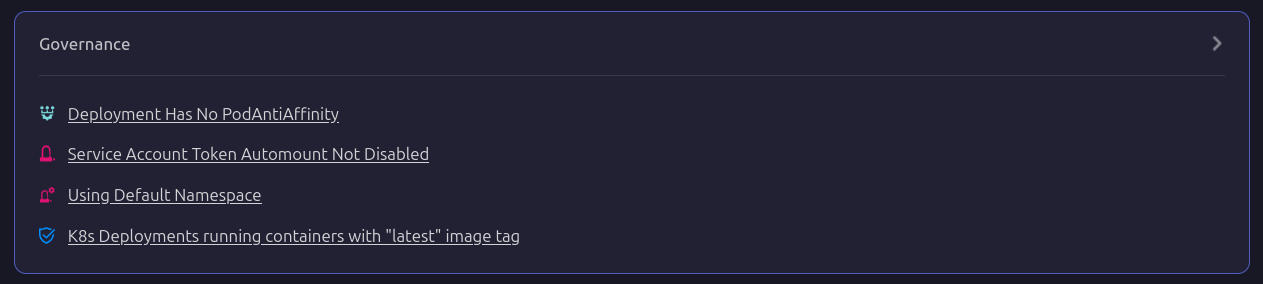
Governance and Security in Scaling
Scaling workloads isn't just about increasing pod counts - it also involves maintaining governance and security standards. Firefly provides detailed metadata for each deployment, including resource allocations, Helm chart versions, and governance policies. It flags potential misconfigurations such as missing pod anti-affinity rules, deployments using the default namespace, or service accounts with auto-mount enabled. These insights help teams enforce best practices while ensuring that autoscaling is applied correctly.
Tracking Helm-Based Scaling with Firefly
For teams using Helm to manage Kubernetes deployments, Firefly provides a Helm chart tracking view. This allows teams to see which Helm releases are deployed, which clusters they are running in, and the last applied revision. Instead of manually tracking Helm releases and their scaling configurations, Firefly centralizes this information in a single view, reducing the chances of misconfigurations across multiple environments.

Firefly simplifies the process of tracking Kubernetes scaling by visually mapping deployment relationships, highlighting governance issues, centralizing configuration tracking, and organizing Helm-based deployments. Instead of manually inspecting deployments with CLI commands, Firefly provides a structured interface for managing scaling across Kubernetes environments.
Frequently Asked Questions
What Is the Difference Between Vertical Scaling and Horizontal Scaling?
Vertical scaling increases the CPU and memory limits of an existing pod, while horizontal scaling adds or removes pod replicas to distribute the load.
How to Scale Down a Pod in Kubernetes?
Use the kubectl scale command to reduce the number of replicas:
or let the Horizontal Pod Autoscaler (HPA) reduce pods based on resource usage.
Does Kubernetes Scale Pods or Nodes?
Kubernetes scales both—HPA adjusts the number of pods based on resource metrics, while the Cluster Autoscaler adds or removes nodes based on available capacity.
What Are the Challenges of Scaling Kubernetes?
Scaling Kubernetes requires balancing resource limits, managing autoscaling thresholds, avoiding scheduling bottlenecks, and ensuring cost efficiency while handling unpredictable workloads.

