Nowadays, Terraform is widely adopted by over 57,000 companies across the United States, United Kingdom, Canada, and beyond: all to manage and automate their infrastructure through Infrastructure-as-Code (IaC).
A key part of Terraform is its state file, which stores all the information about the resources managed by it. A state file helps Terraform manage the current state of the infrastructure and update it with the desired state in real time. And securing a state file is vital because it contains all the data about your infrastructure, such as resource configurations, metadata, and other sensitive information. But if the state file is not monitored or secured properly, it can lead to issues like misconfigurations, security risks, or unexpected changes within your infrastructure, compromising data protection.
In this blog, we’ll dive into all things Terraform state file, from the importance of securing and auditing them, to the best practices that you should follow for detecting unauthorized changes (like using versioning and logging).
What's a Terraform State File?
When you run terraform apply, Terraform creates the state file, named terraform.tfstate, in the current directory. However, it’s always a best practice to store the Terraform state file within a remote backend instead of a local state file, such as AWS S3, Azure Blob Storage, or Google Cloud Storage, especially when you are working with a team.

Each time you apply changes to your infrastructure with [.code]terraform apply[.code] or tear it down with [.code]terraform detroy[.code] command, the state file is updated with the details of the resources created, modified, or deleted. This state file stores important details of your resources, such as metadata and configuration files, which Terraform uses to keep your infrastructure in sync with the desired state.
Without this file, Terraform wouldn’t be able to keep track of the changes made to the infrastructure using Terraform code, which could lead to issues like duplicating resources. For example, if a resource is created directly through the cloud's console without updating the Terraform state file, Terraform may try to recreate it during the next [.code]terraform apply[.code], resulting in duplicates.
Now, let’s see how this Terraform state file works through an example, where we would create an EC2 instance with the help of Terraform.
Firstly, create an AWS EC2 instance using Terraform:
After initializing Terraform with [.code]terraform init[.code], you can apply this configuration by running [.code]terraform apply[.code] command. Terraform will create the EC2 instance and generate a state file that records key information about the resource, such as its ID and config.

To get an overview of all the resources that Terraform manages, you can run the [.code]terraform state list[.code] command, which will display a list of all the resources stored in the state file with resource type and name. For this example, it would output the [.code]aws_instance.firefly_web_server-01[.code] resource:

If you want to dive deeper into the details of the resource within your state file, you can use the [.code]terraform state show[.code] command, which will provide detailed information about the resources, here, EC2 instance:
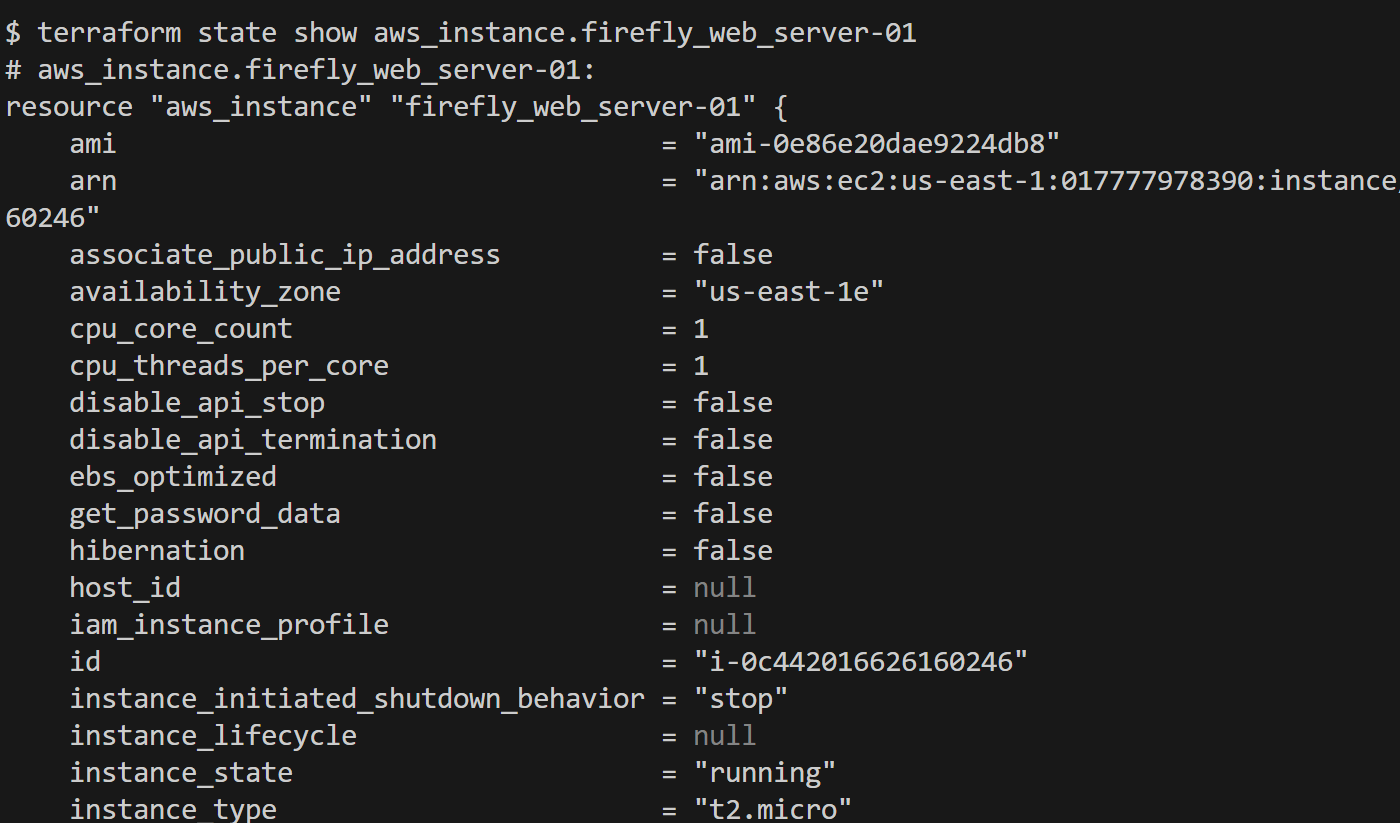
These two commands help you inspect the state file and see what Terraform tracks and manages within your infrastructure.
Now that we’ve seen how the Terraform state file works, let’s talk about the importance of auditing state file access.
Why is It Important to Audit Terraform State File Access?
The Terraform state file is more than just a log of what’s been created or modified; it contains some important data about your infrastructure, including resource metadata and other configuration details. This sensitive data can make the state file a target for potential misuse. If someone gained access to this file, they could easily retrieve information, modify resources, or compromise your infrastructure's security or configuration.
Auditing allows you to track every interaction with the state file, whether it’s being accessed, modified, or listed. This not only helps safeguard your sensitive data but also ensures the integrity of the state file, preventing exposure of critical information in plain text.
By monitoring these interactions, you can quickly troubleshoot any issues and maintain a clear understanding of your infrastructure’s changes for the long term.
Understanding the Risks of Unauthorized Access
Now, let’s look at the specific risks of in case someone with unauthorized excessive permissions gains access and how it can directly impact your infrastructure.
- Risk of Resource Misconfiguration: The Terraform state file contains some important information about the resources within your infrastructure, such as resource IDs, private IP addresses, and other configuration settings, which Terraform uses to manage and track the resources. However, if this information is not handled carefully, it can lead to problems. For example, if a new team member was supposed to have read-only access to the state file but was provisioned full access and changed the private IP address of an EC2 instance. Now, this change could easily disrupt the network, affecting any applications running on it and causing downtime.
- Modifying resource configurations: When a team member has more access to the infrastructure than they should, even a small change can lead to big problems. For example, a team member who was supposed to have read-only access to the state file accidentally gained full access. Without realizing it, he changed the instance type of an EC2 instance from t2.micro to t3.large. This change can have a significant impact, as it might increase costs, affect performance of the application, or even introduce compatibility issues with the rest of the infrastructure. If these kinds of changes go unnoticed, they can lead to unexpected downtime, misconfigurations, or even security vulnerabilities within your cloud environment.
- Compromising infrastructure security: If the state file is not securely stored, anyone with access could simply make tweaks to it, such as misconfiguring your security groups or changing any resource’s configurations, which could cause downtime or network issues within your infrastructure. To avoid this, the state file should never be stored in any Git repository, whether public or private. Instead, it should be kept in secure backends like AWS S3, Azure Blob Storage, or Google Cloud Storage with encryptions to make sure only authorized team members can access and modify the state file.
Here's an Example Scenario of Security and Access Control Done Right
To make sure that your Terraform state file is secure and only accessible by authorized team members, a best practice is to store it in an AWS S3 bucket with proper IAM policies applied to that bucket. If you're using Azure or GCP, equivalent options include Azure Blob Storage or Google Cloud Storage.
In the below example, we’ll walk through the process of creating an AWS S3 bucket to store the Terraform state file, implementing access controls for different users using IAM policies, and configuring Terraform to use the S3 bucket as the backend for storing the state file.
Step 1: Create an S3 Bucket
First, we’ll define the Terraform configuration to create the S3 bucket for storing the Terraform state file:
Step 2: Full Access Policy for User 1
Next, we’ll create an IAM policy that grants User 1 (Saksham) full access to the S3 bucket with read, write, and delete permissions:
Step 3: Read-Only Access Policy for User 2
Now, we’ll create a read-only IAM policy for User 2 (Sid), allowing him to view the Terraform state file without modifying it:
Step 4: Initialize and Apply the Configuration
Now that we’ve defined the S3 bucket for storing the state file and set up the necessary IAM policies, it’s time to initialize configuration by running [.code]terraform init[.code] and then apply the configuration using [.code]terraform apply[.code].

Step 5: Create a New Configuration File for Resource Creation
Let’s create a new file, resource.tf, to create another S3 bucket. Also, define the backend configuration for tracking the state with the firefly-test-bucket-terraform S3 bucket.
Step 6: Initialize and Apply the Configuration
Now, initialize and apply the new resource configuration to create the S3 bucket.
Initialize the backend by running [.code]terraform init[.code] command:
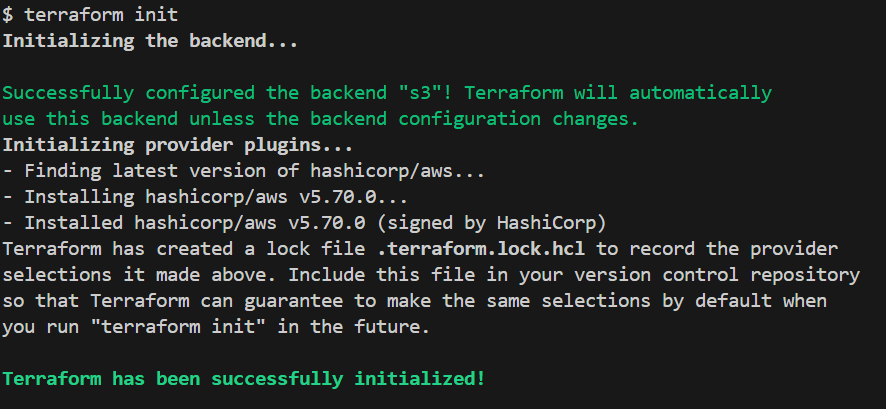
Now, apply the configuration with [.code]terraform apply[.code] command. Terraform will create the new S3 bucket, and the state file will be stored securely in the ‘firefly-test-bucket-terraform’ S3 bucket.
Step 7: Verify Access Using AWS CLI
Now that you’ve successfully applied the configuration and the Terraform state is also stored in the S3 bucket, it’s important to verify that the IAM policies are working as expected for both Saksham (full access) and Sid (read-only access).
Firstly, run the [.code]aws configure[.code] command to configure the AWS CLI for Saksham, providing the required AWS Access Key ID and Secret Access Key when prompted:

Now that you are authenticated as Saksham, we can verify the full access permissions granted by the IAM policy. First, list the contents of the S3 bucket to check whether Saksham has permission to view the files in the bucket with [.code]aws s3 ls s3://firefly-test-bucket-terraform[.code] command:

Here, Saksham has the list permission to the files in the bucket without any errors.
Next, test if Saksham is allowed to write to the state S3 bucket. Create a test file and upload it to the bucket:
echo "Testing Saksham's full access" > test-file.txt
aws s3 cp test-file.txt s3://firefly-test-bucket-terraform/test-file.txt
Finally, delete the file you just uploaded to verify Saksham has permission to remove objects from the bucket with [.code]aws s3 rm s3://firefly-test-bucket-terraform/test-file.txt[.code] command:

The deletion is confirmed by the ‘delete:’ output message.
These steps confirm that Saksham has full access to the S3 bucket, including listing, uploading, and deleting files. If any of these operations fail, it may indicate an issue with the IAM policy or permissions.
After verifying Saksham’s full access, we’ll now switch to Sid to make sure that his read-only permissions are correctly applied. To switch to Sid, reconfigure the AWS CLI with Sid’s credentials:

Once configured, we can verify Sid’s read-only access.
Start by listing the contents of the S3 bucket to check if Sid has permission to view the files with [.code]aws s3 ls s3://firefly-test-bucket-terraform[.code].

Next, try to upload a file to test whether Sid’s restricted access prevents him from making changes:
echo "Testing Sid's restricted access" > test-file.txt
aws s3 cp test-file.txt s3://firefly-test-bucket-terraform/test-file.txt

Since Sid has read-only access, this action is denied and results in an error message.
How Can Unauthorized Modifications to a Terraform State File Be Detected?
Once you have secured access to the Terraform state file, it’s important to implement some strategies to find out if any changes to your infrastructure have been made by someone outside of your team. By enabling versioning, setting up logging, conducting audits, and configuring real-time alerts, you can maintain full visibility over modifications to your state file and protect your infrastructure from unexpected issues.
1. Enable Versioning in the Remote Backend
To detect unauthorized modifications, the first step is to enable versioning in the backend where the Terraform state file is stored. For example, if you're using AWS S3 as your remote backend, enabling versioning means that every time the state file is updated, a new version is created and stored.
Versioning allows you to keep track of all changes made to the state file over time. If you notice an unauthorized modification, you can easily restore the previous version of the state file to make sure that your infrastructure remains secure and consistent. This simple step helps in identifying when changes were made, providing an easy way to revert unauthorized updates.
2. Set Up Access Logging
Next, it’s important to set up access logging to monitor who is accessing the state file and what actions are being performed. In services like AWS S3, you can enable server access logging to capture detailed records of every access request made to your S3 bucket.
Access logs give you a clear picture of the interactions with the state file, including who accessed it, when, and from where. By reviewing these logs regularly, you can understand your user base or identify any unusual access patterns activity. For example, you might spot an access attempt from an unexpected IP address or during a time when changes are not expected. These logs are essential for investigating potential security incidents.
3. Audit and Review Logs Regularly
Setting up logging is only the first step. To truly protect your infrastructure, you need to audit and review logs regularly. This means reviewing your access logs for any unusual activity, such as unexpected changes or manual updates to the state file.
It is standard practice to schedule log audits and look for red flags, such as repeated access from unfamiliar sources, drifts, or unusual modification patterns. Regular auditing ensures that you’re proactive in detecting manual modifications or mistakes before they escalate into incidents.
In addition to manual reviews, you can also integrate automated systems that analyze logs, state files and flag any anomalies, allowing you to focus on high-risk events that need immediate attention.
4. Set Up Real-Time Alerts
Finally, to ensure that you are notified the moment an issue arises, you should configure real-time alerts. By integrating your logging system with a monitoring service, such as AWS CloudWatch, you can set up alerts that trigger when certain conditions are met - for example, when there’s an infrastructure drift in the state file or unknown state file access.
These alerts can be sent directly to your team via email, SMS, or Slack. Real-time notifications help you respond quickly to any unauthorized modifications, allowing you to take immediate action to secure your infrastructure.
For example, if someone attempts to delete or change the state file, your monitoring system can send out an alert, enabling your team to investigate the issue immediately and prevent further changes.
5. Enable State Locking
Last but not least, it's important to enable state locking for your remote backend to prevent multiple operations from modifying the state file simultaneously. Terraform supports state locking within remote backends such as AWS S3, Azure blog, or GCS. State locking makes sure that when one person runs a command like [.code]terraform apply[.code], no other user or process can change the state file until that operation is finished. This prevents us from any conflicts or misconfiguration, ensuring the stability of your infrastructure. By using state locking, you add an extra layer of protection, making sure that no overlapping updates disrupt your infrastructure.
Enhancing Terraform State Auditing with Firefly's Cloud Governance
Managing your Terraform state file across different cloud platforms like AWS, GCP, or Azure can be a bit complex. Ensuring all of the best practices for securing and auditing your Terraform state file are in place manually or writing custom logic for them is often very time-consuming. You can make this process much easier, especially in multi-cloud environments, by using Firefly.
Firefly offers pre-built features that simplify the auditing and monitoring of state files, helping you keep track of changes and ensure security across multiple clouds.
Let’s take a closer look at how Firefly’s multi-cloud support and other features can improve the way you manage all the resources within your infrastructure.
Inventory Your Cloud Assets
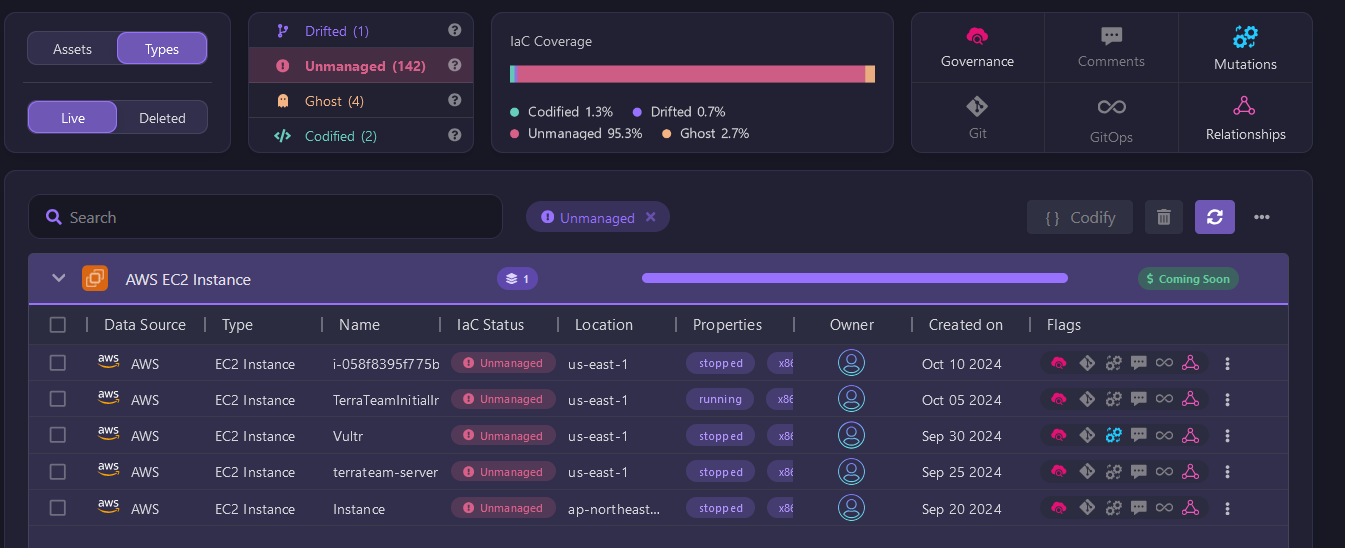
Firefly simplifies managing your resources by categorizing them into different states such as Drifted, Unmanaged, Ghost, and Codified. This gives you a clear overview of your infrastructure and highlights areas that need attention, allowing for better tracking and security.

Stay Aware of Drifted Resources
Drift happens when the actual state of your infrastructure diverges from the intended configuration defined in your IaC. Firefly detects drifted resources by comparing your Terraform state file with the actual cloud resources. If any differences are detected, they are marked as “Drifted.” For example, if a security group rule was changed manually outside of Terraform, Firefly will flag this as a drift.
By keeping an eye on the drift, you can make sure that the changes to your infrastructure are tracked and managed through your Terraform code, avoiding any configuration mismatches that could lead to security risks or infrastructure issues.
Without this feature, you would have to run [.code]terraform plan[.code] regularly to check for drifts. If you forget to run it or haven't done so for a long time, drift may go unnoticed, potentially leading to configuration mismatches within your infrastructure.

Identify Your Unmanaged Resources
Unmanaged resources are those that exist in your cloud environment but are not currently tracked by your IaC tool. These could be resources that were created manually or by third-party services. Firefly scans your cloud environment and identifies all unmanaged resources, giving you a clear view of what’s outside your Terraform management.
Without Firefly, discovering unmanaged resources would require manual audits or custom scripts, which can be tedious and time-consuming. By highlighting these unmanaged real-world resources, Firefly helps you bring them under management, allowing you to codify them and ensure they are versioned and controlled like the rest of your infrastructure.
Find Any Ghost Resources That Got Left Behind
Ghost resources refer to cloud resources that are no longer actively used or tracked but still exist in your environment. These could be resources that were left behind after previous deployments or during migrations. Firefly identifies these ghost resources, allowing you to clean up your environment and eliminate potential vulnerabilities or unnecessary costs.
By cleaning up ghost resources, you can reduce cloud costs and improve the security posture of your infrastructure by removing outdated or abandoned assets.

Get Visibility into Codified Resources
Lastly, codified resources are those that are fully managed and tracked by your IaC tool. Firefly helps ensure that these resources stay in sync with their defined configuration. It gives you confidence that your codified resources are correctly deployed and managed, reducing the risk of unexpected changes or drift.
Firefly provides a powerful way to gain visibility into the state of your cloud resources, categorizing them to help you manage drift, identify unmanaged or ghost resources, and ensure that codified resources remain stable and secure. By using Firefly’s cloud inventory tools, you can maintain better control over your entire infrastructure.

Asset Mutation: Track Changes and Comparing Versions
When managing your cloud infrastructure, it’s important to keep track of every change. Firefly’s Mutation Log helps you monitor and review all the modifications made to your resources. This feature lets you view past changes and compare different versions of your assets, giving you a clear picture of how your infrastructure evolves over time.
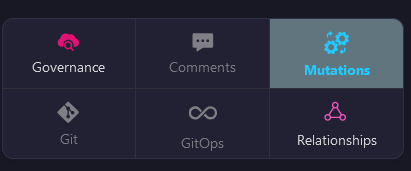
In the mutation log, Firefly records every change, whether it’s made manually or through automation. For example, if the public IP of an EC2 instance was initially set to true but later changed to false, the log will show both the old and new configurations. This gives you transparency into what was modified, when it happened, and how the resource was configured before.
Comparing Versions
Using the Mutation Log, you can easily compare different versions of your resource configurations. For example, if an EC2 instance is updated, Firefly provides a side-by-side comparison of the previous and current configurations. This makes it easy to spot any unintended changes and helps ensure that you’re always aware of how your resources are being managed.
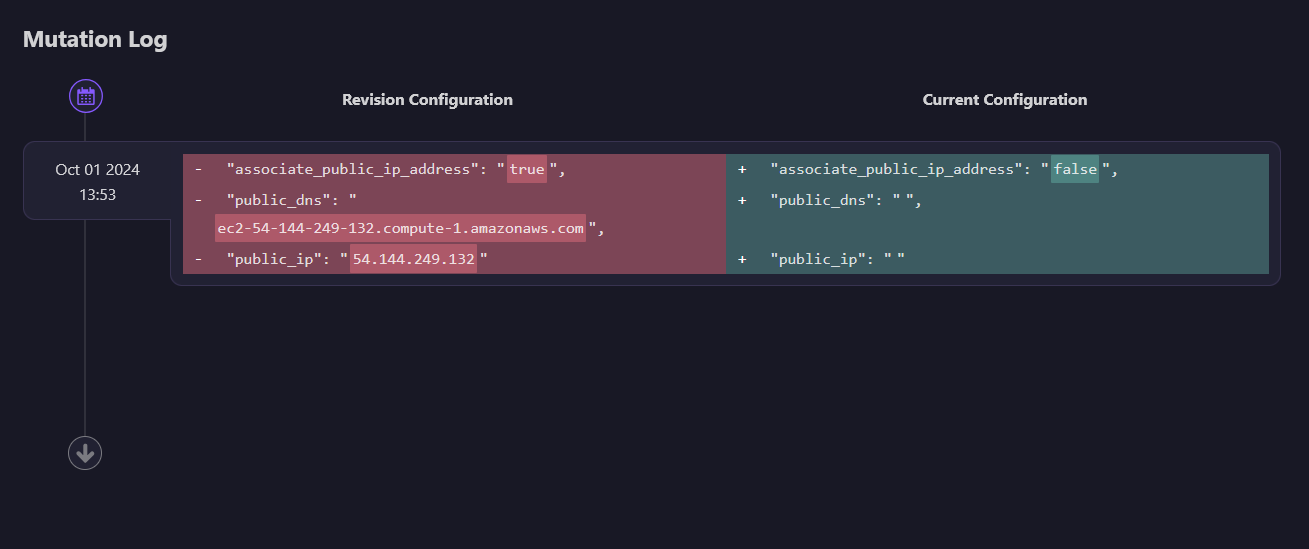
Without Firefly’s mutation tracking, if you had to analyze changes yourself, you would need to download different versions of the Terraform state file and manually compare them, which can lead to unnecessary overhead and complexity. With Firefly’s mutation tracking, you gain full visibility into every change made to your infrastructure, helping you stay in control and informed about how your cloud environment is evolving.
Governance: Monitoring and Enforcing Policies for Cloud Accounts
As your cloud infrastructure grows, maintaining compliance and making sure that all your resources follow best practices becomes increasingly important. Firefly’s Governance feature helps you monitor and manage your cloud accounts by applying policies that enforce security, compliance, and other essential configurations. This ensures that your cloud resources stay in line with industry standards and internal requirements.
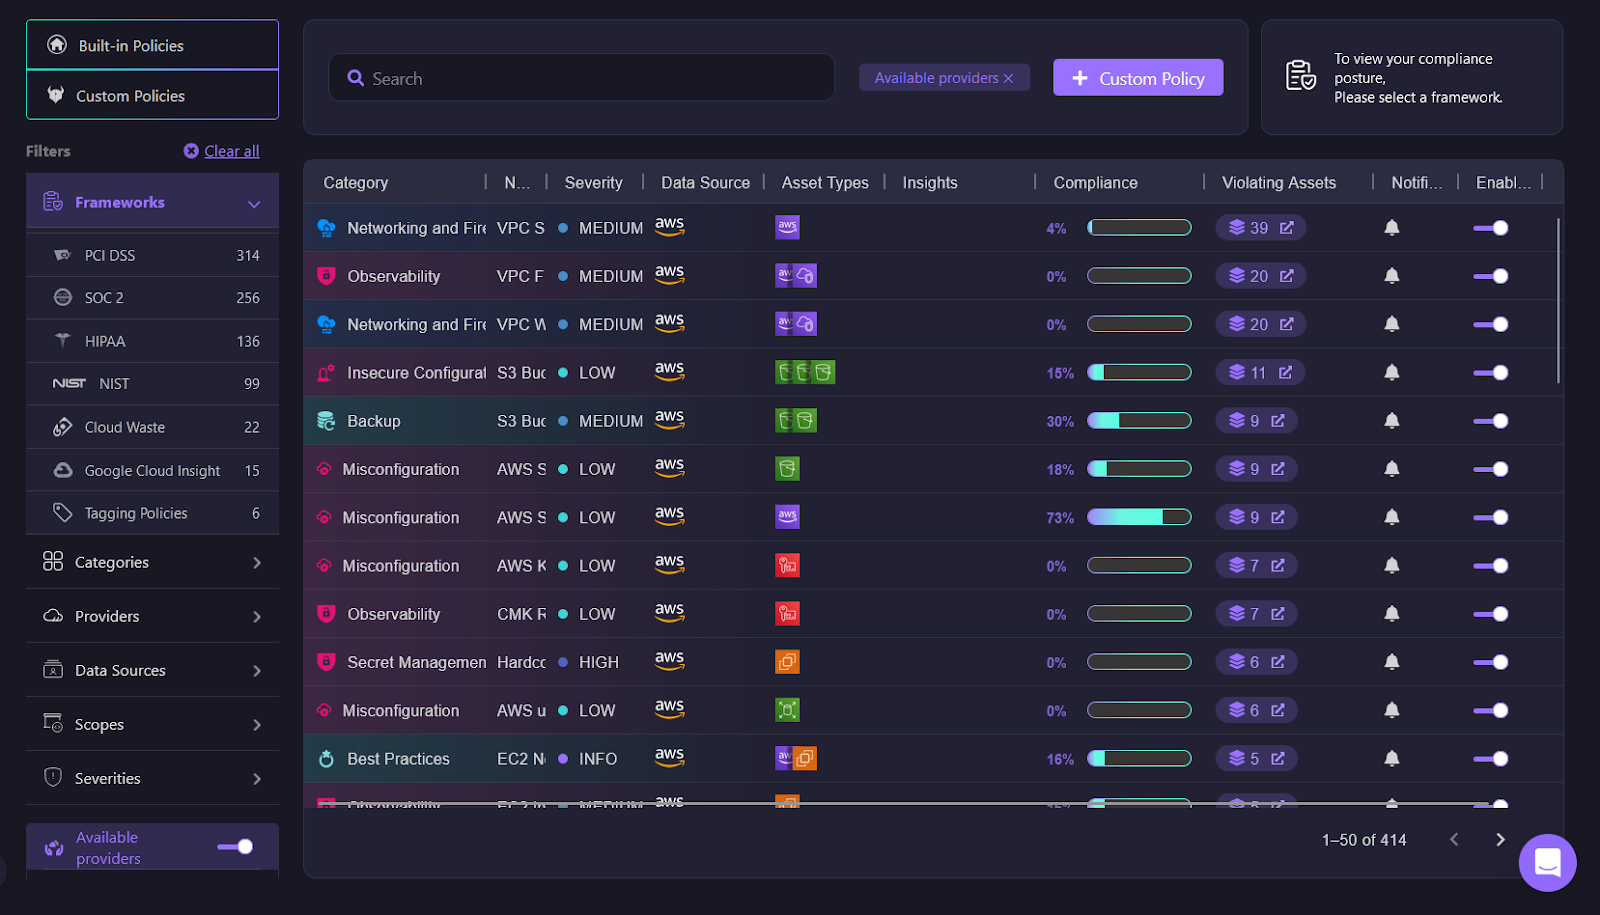
In Firefly’s governance dashboard, you can see a clear view of how your cloud accounts are being monitored. Whether you’re working with frameworks like PCI DSS, SOC 2, or HIPAA, Firefly helps you track how compliant your resources are with these standards. It also gives you insights into where any gaps might exist and which assets need attention.
Built-in and Custom Policies
Firefly comes with a set of built-in policies that cover common cloud security and configuration best practices. These built-in policies help you quickly start monitoring your resources for things like encryption, access control, and logging. They act as a strong foundation for cloud governance, making sure your infrastructure is on the right path.
For organizations with more specific needs, Firefly also supports the creation of custom policies. This means you can create policies specific to your company’s unique requirements, making sure that your cloud governance aligns perfectly with your operational and compliance goals.
Monitoring Cloud Accounts for Compliance
Once your policies are in place, Firefly continuously monitors your cloud providers to check whether your resources meet the required standards. For each resource, you can view compliance scores and see which ones need fixing. By organizing these into categories based on severity, Firefly helps you prioritize issues that need immediate attention.
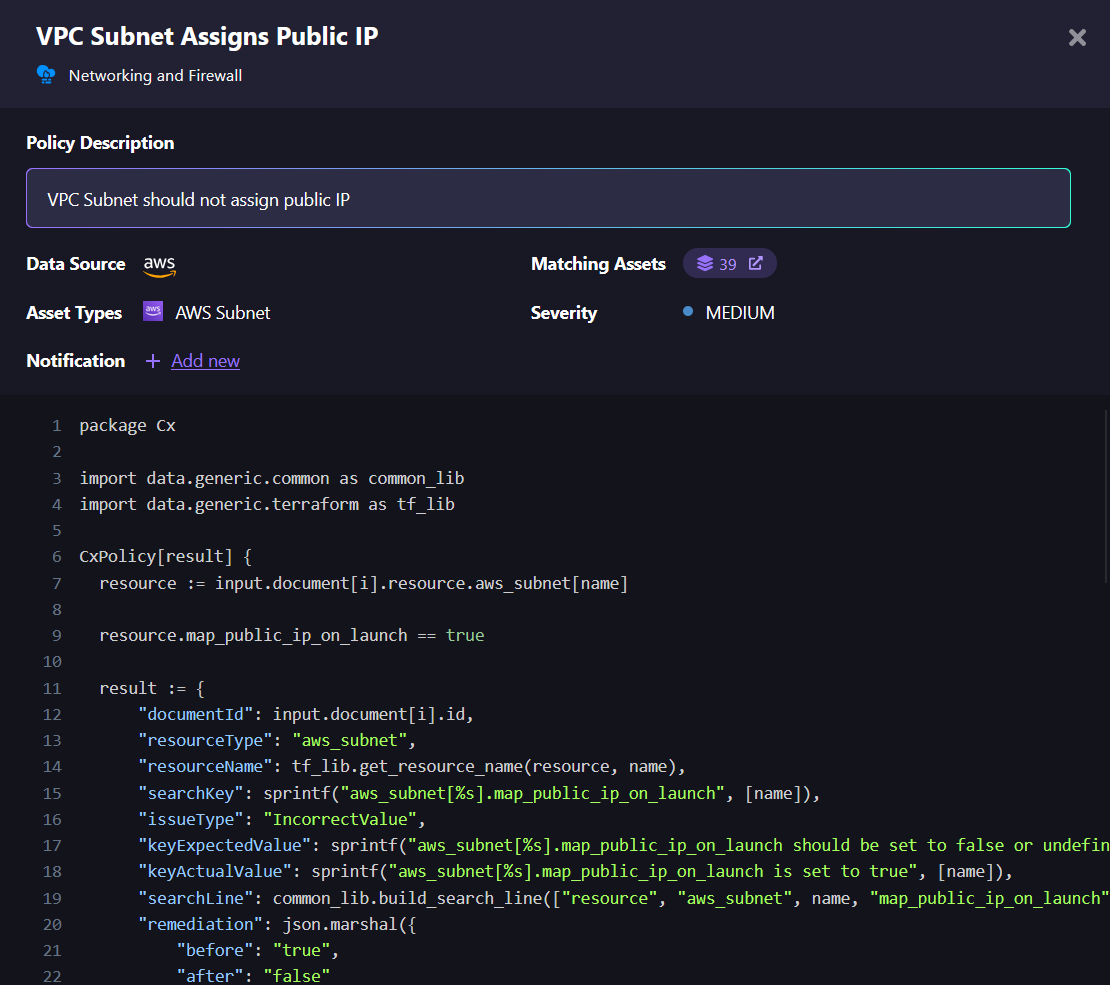
With Firefly’s governance features, you gain a straightforward way to enforce policies, monitor compliance, and get notified about misconfigurations, making sure that your cloud environment is well-managed and secure.
Alerts Integrations: Keeping Your Team Notified in Real-Time
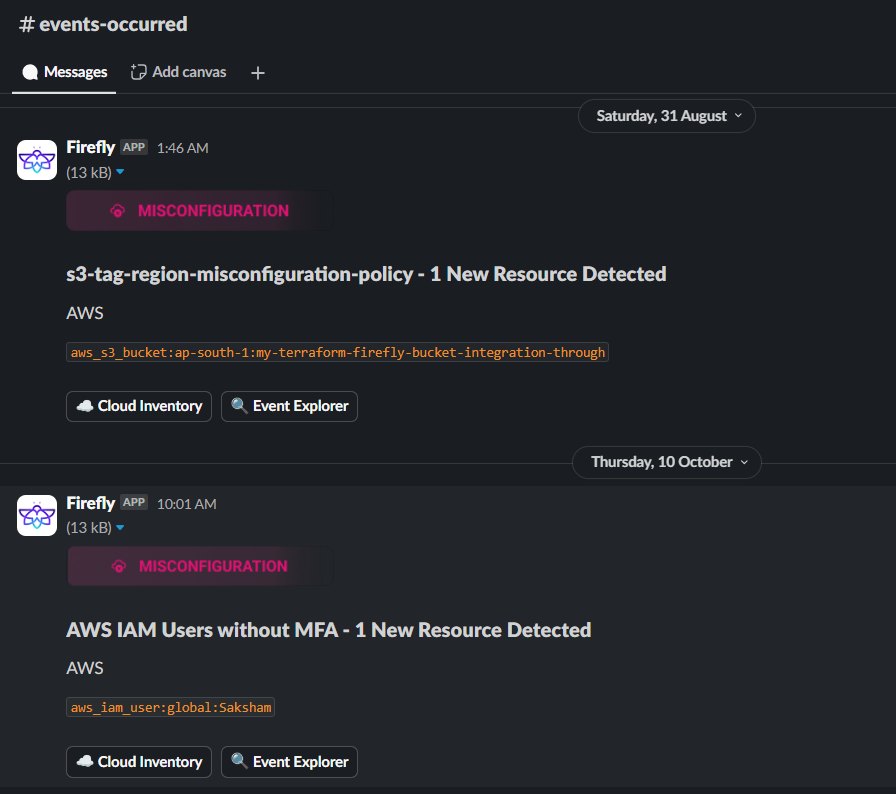
Staying updated about important events within your cloud infrastructure is essential for keeping everything running smoothly. Firefly makes this easy by allowing you to set up alert integrations with tools like Slack and other communication platforms. This ensures that your team is notified right away if something significant happens, such as a change in the state file or modifications to resources. By receiving these alerts promptly, you can quickly address any issues, helping to maintain the security and proper configuration of your infrastructure.
Integrating with Slack
With Firefly, you can set up alerts to send notifications to specific Slack channels. For example, if a rule is broken, like a public IP being assigned to a resource that shouldn’t have one. Firefly will send an alert to your chosen Slack channel so your team can fix the issue immediately.
All in all, Firefly makes it easier to manage and secure your cloud infrastructure. With features like change tracking, alerts, and strong governance, you can keep your resources safe and make sure everything runs smoothly within your infrastructure. By using these tools, your team can stay in control and quickly respond to any issues, which will help you manage your cloud setup with more confidence.


