
Terraform has become the de facto standard for provisioning and managing infrastructure, with estimates of approximately 80% of the industry relying upon it for their cloud management needs. Infrastructure as code has enabled engineering organizations to derive the same benefits of managing their infrastructure code, as they’d manage their application code, in git, with version control, policy management and more.
At the same time, continuous integration (CI) has become the backbone of engineering processes that ensures that code changes, including IaC, are automatically tested before being deployed to avoid failures and downtime. However, when it comes to building CI pipelines for IaC, and in this example we will demonstrate this using Terraform, the process can become complex and cumbersome. IaC hasn’t managed to derive the same automation benefits of CI/CD, as application code has––and this needs to change!
Typically, DevOps engineers face two primary options when setting up CI pipelines for their IaC––the Do It Yourself (DIY) approach or offloading to third-parties through a fully managed solution.
The DIY Approach to CI Pipelines
To date, most engineering organizations manually configure CI pipelines from scratch per Terraform deployment, which becomes tiring and repetitive at scale. This consists of two primary steps, the Terraform `plan` phase which compares the plan to your existing cloud configurations, and helps the engineer validate the changes before applying them.
Once validated, next comes the Terraform `apply` phase, which practically applies these changes through API calls to your cloud, based upon the `plan` phase and configuration changes defined. Between these two steps, it’s common to add open source tools to provide additional guardrails to deployments, from misconfigurations to policy violations, and security (like KICS, Trivy, or Open Policy Agent), as well as cost estimations like InfraCost to provide greater control over cloud security and cost. Once deployed, all of this needs to be monitored and maintained in the long-term, all without a UI, mostly relying on blob-format CLI data that is hard to understand and visualize. Rinse and repeat per CI pipeline.
The Managed Approach to CI Pipelines
Due to its near ubiquitousness, many third-party solutions have popped up over the years to provide a fully managed Terraform experience––namely Terraform Automation and Collaboration tools (AKA TACOs). While this type of third-party platform will provide an end-to-end solution for hosting module registries, building and managing pipelines, secrets, and state files––it comes with the tradeoff of cost, and administrative access to cloud resources and environments, literally requiring the keys to the castle. They have also been witnessing some difficulty with Terraform’s licensing change in August that has impacted Terraform related service offerings after version 1.6, like the subsequent acquisition announcement by IBM.
Where This Breaks Down - What Users Need
On the one hand, engineers don’t have time to build these pipelines from scratch, so they for the most part, create very basic pipelines running from local, rarely with any cost, security, and policy configuration considerations. These pipelines then output a huge CLI blob of text, that many times relying on faith and prayer are applied in the hopes that there will not be any breaking changes to the infrastructure.
On the other hand, either TACOs become very costly with Terraform recently changing their pricing to be RUM-based (resource under management), while taking away all of the autonomy, and sometimes locking you into their services as a result. As noted above, following the IBM acquisition announcement, many TACOs are now recommending users migrate away from Terraform to OpenTofu, which many engineering organizations are not quite ready to do. So it’s much of a Catch-22.
Enter Firefly Workflows
Firefly’s existing platform has been focused on providing cross-cloud asset inventory and management, as well as codification of unmanaged resources––alongside the benefits that are derived from this comprehensive view and codification. This enables Firefly to add a simple step between the codification and deployment––named Workflows, which enables the automation of the CI pipeline building process reducing the friction, overhead and costs significantly. By bridging the gap between DIY pipelines and costly third-party solutions, Workflows make it possible to automate Terraform deployments within your existing CI/CD workflows without the need for extensive manual setup, while avoiding vendor lock-in.
How it Works - Workflows Under the Hood
Firefly enables you to create a full end-to-end managed pipeline, and visualize it alongside the rest of your cloud asset inventory. You are also able to import your existing pipelines, and plug in the guardrails and scanners for security, policy violations and cost optimizations through a library of pluggable scanners, without the hassle of managing and maintaining it all yourself. This makes it possible to manage your own CI pipelines, based on your existing tooling and stack, and custom requirements.
Below we’ll walk through both examples, so you can learn how to get started.
Building Your Own Pipeline from Scratch
In the example below, we’ll walk you through creating your first workflow in the Firefly platform from scratch.
1. Navigate to the Workflows page inside the Firefly platform, and select “Add New Workflow”.

2. Select your IaC provisioning engine of choice. In this example, we will use Terraform as our demo.

3. Next, select "Generate new IaC pipeline".

4. Next, select your CI tool of choice; in this example, we have selected GitHub.

5. Click on “Create key pair” to generate Firefly keys and store them as the repository secret in GitHub. The Firefly custom action uses the keys to authenticate into the Firefly platform.
6. The next step is intended for you to be able to identify the CI pipeline you are creating. You will need to enter the workspace name, and this will be the name shown for this Terraform project in Firefly, so ensure it is uniquely identifiable. Naming workspaces appropriately helps manage and distinguish between different deployment stages and projects. For the sake of this project, we have set the workspace name to “aws-stage”.
7. In the General Configuration step, the platform provides the flexibility to select the location where the Terraform project will be saved in our VCS. This enables users to define which repository, and the working directory for this project.

8. The next step is the actual Terraform Configuration, where we define the Terraform configuration for the project. In this step, you can choose the Terraform version that will be used, customize the Terraform variables, as well as the TFvars file path, as needed.

9. The next step enables users to define Advanced Configuration requirements, where you can set additional settings for your project. For example, adding a `stage` label to the workspace which can later be used to sort and filter in the Workflows dashboard page.

10. The next step provides a preview of the CI code. At this stage, you can copy the code or choose to create a pull request directly from the Firefly platform. We will choose to create a pull request directly.

11. After creating the pull-request, you then navigate to your VCS (in this example Github), and merge the new CI pipeline into your development workflow.


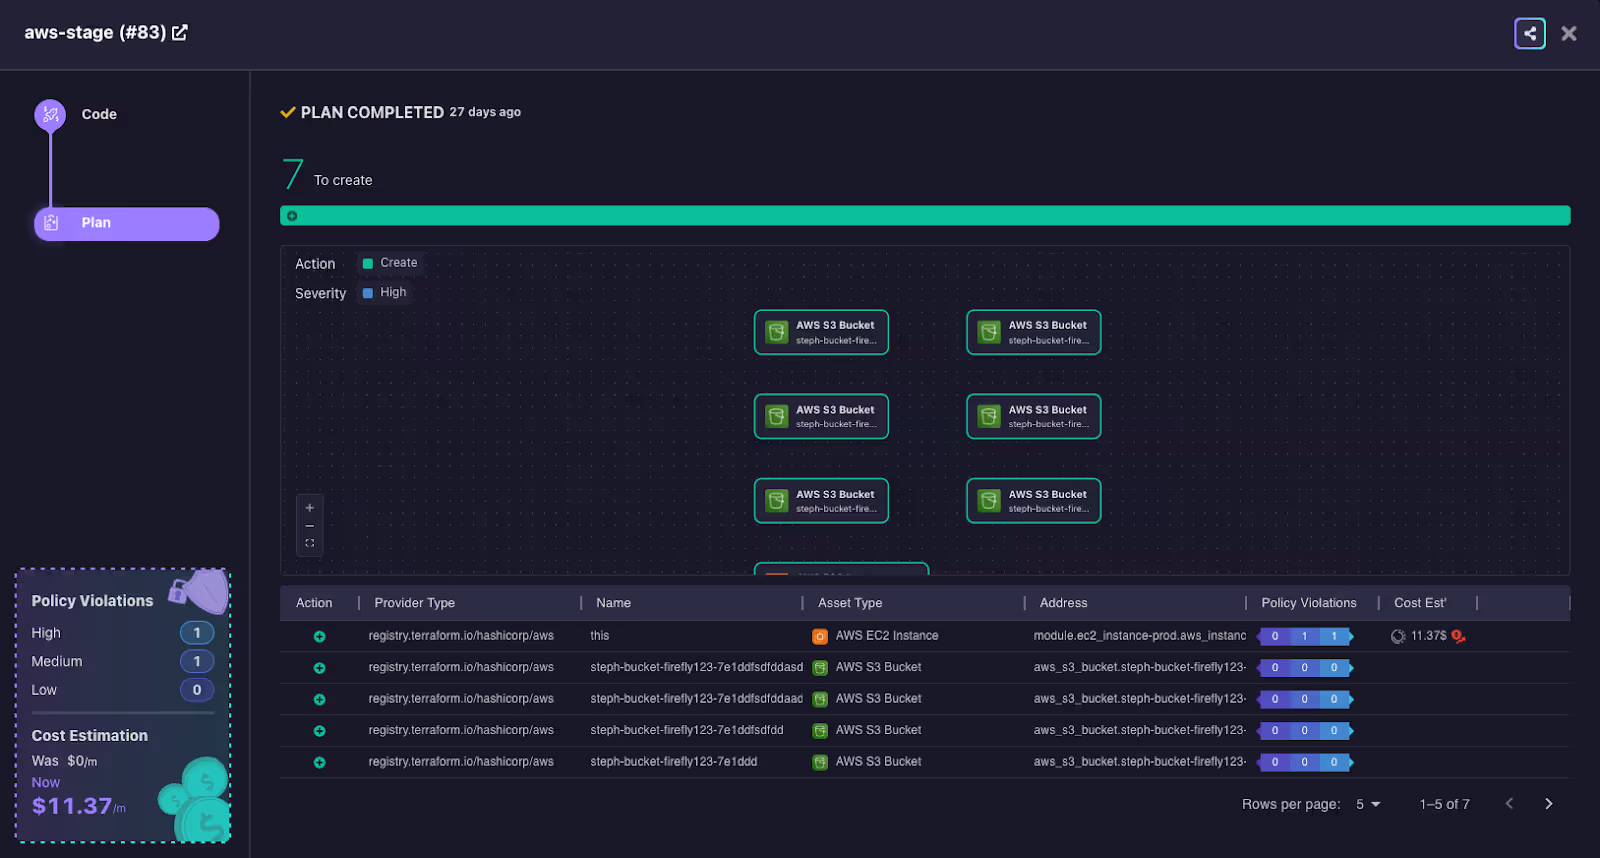
12. From this point onward, creating a PR in this Terraform project will trigger the `plan` Terraform stage, and merging into the main branch will trigger the `apply` Terraform stage, which you will be able to see in the Firefly dashboard, each time the CI pipeline is triggered.
Importing Your Existing CI Pipelines
Now we are going to explain how to import existing CI Pipelines into your Firefly dashboard, that will enable you to not only gain the same visibility for each time the pipeline is triggered in the very same dashboard, but also the added benefits of managing your cloud asset inventory in the same place.
1. We will begin by generating Firefly keys from the Firefly platform under Settings > Users > Create Key Pair.

2. Like the process above, you will also need to store the Firefly keys as the repository secret to enable your CI Pipelines to run in your VCS of choice. Add them to your CI pipeline as environment variables as “FIREFLY_ACCESS_KEY” and “FIREFLY_SECRET_KEY”.

3. Run the following commands to your CI in order to download the Firefly CLI tool:
4. Replace the “terraform plan” command with:
This command saves the plan output as JSON and saves the plan log in order to later pass it to the Firefly CLI tool.
5. Following the “terraform plan” step , you will need to add an additional step for the Firefly post-plan:
To do so, replace <WORKSPACE_NAME> with an identifiable name that will be displayed in the Firefly dashboard. Naming workspaces appropriately helps manage and distinguish between different deployment stages.
Running this command will send the plan output to Firefly (the CLI redacts any sensitive information). Firefly will run the scanners and you will see the plan in the Firefly platform.
6. Once we have completed the `terraform plan` phase, we can now move on to the `terraform apply` phase, and do the same thing. We will start by replacing the “terraform apply” command with:
Similarly to the `plan` phase, this command will now save the `apply` log as JSON in order to later pass it to the Firefly CLI tool.
7. Following the “terraform apply” step add a new step for the Firefly post-apply:
Replace <WORKSPACE_NAME> with the same name in the Firefly post-apply command.
Running this command will send the apply log to Firefly (the CLI redacts any sensitive information). Firefly will run the scanners and you will see the `apply` log in the Firefly dashboard.
That’s it! Whether you’d like to create your own CI pipeline workflows from scratch, or import your own by walking through these simple steps you will be able to get started with Firefly’s new workflows functionality, and visualize it all inside the Firefly platform.
Wait! There’s more!
If you’re more of a visual learner, you can also check out this excellent video tutorial by Ned in the Cloud on how to get started with Firefly Workflows.
Next up we’ll dive into specific examples for Github, Gitlab, and Azure Pipelines.
Ready to try Workflows yourself? Get started now!

.svg)